
Aug 4, 2019 | quick tips, web development
This really shouldn’t be this difficult
I’m old enough to remember having to creating nesting tables in order to get decent looking web layouts. I also remember almost having a nervous breakdown trying to find where you didn’t close and table cell tag somewhere in a sea of never ending, nested html tags, sometime nested 7 or 8 tables deep. Good times.
One of the things that I did like about tables was the alignment options for cells. It was extremely easy to center content vertically in a <td> tag just by setting some up a simple attribute valign=”center”. Boom! Done. I always wondered why there wasn’t really a similar vertical-alignment CSS style rule for elements that worked as simply for <div> tags. There is a CSS rule VERTICAL-ALIGN but it doesn’t work the same as the table attribute. Vertical centering is something people would want to do all the time. Displaying an image centered in the middle of a <div> container, perfect use case and a pain in the ass to accomplish. I have often just used a table with a single cell to vertically align something after getting frustrated trying to do it without tables.
The DISPLAY options TABLE and TABLE-CELL appeared but I never really got them to work the way I wanted. Maybe I was just doing it wrong, it wouldn’t be the first time. I’ve created an entire art form from doing it wrong. I also read about a million ways of nesting containers in other container with different margins and style rules. That didn’t seem like a big improvement over the table nesting strategy.
Then came along the DISPLAY option FLEX and things got a whole lot easier. If you’re already familiar with this DISPLAY option then move along. There’s nothing new for you to see here. If you’re not familiar with FLEX then read on, you might discovery something useful.
Flexbox Layout is the actual name of the WC3 Candidate Recommendation. It’s purpose is to provide a more efficient way to lay out, align and distribute space among elements in a container even when the height and/or the width of the container may be unknown. It has a lot more functionality then the simple application I’m going to describe here, but this is just a quick tip 😉
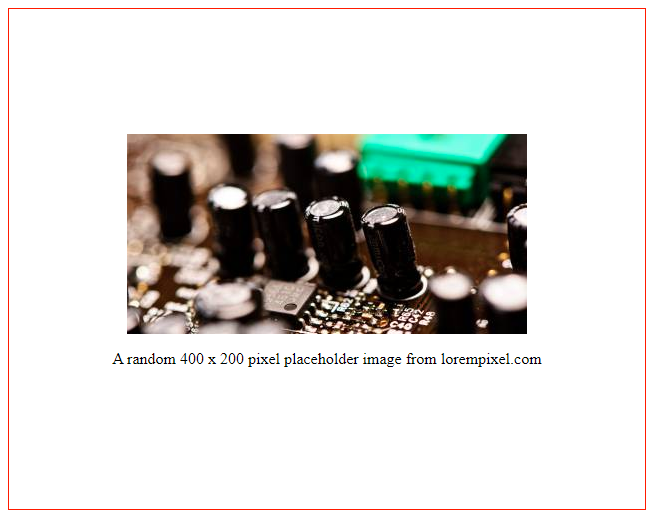
For this example lets pretend we have a <div> element on our page that will have an unknown height. We want to display an image and a paragraph of text below that image and make sure all the content is vertically aligned in the center of the <div> container.
This is the HTML snippet for our example:
Simple HTML. A DIV with a class of container with two child elements; an image and a paragraph of text.
<div class="container">
   <img src="https://lorempixel.com/400/200/" alt="random 400x200 placeholder image from lorempixel"/>
   <p>A random 400 x 200 pixel placeholder image from lorempixel.com</p>
</div>
The CSS
Here is the CSS class to assign to our container. I’ve added height and border attributes for demonstration purposes. It will allow you to easily change and see the height of the container to test that the content does stay vertically aligned.
.container {
  display: flex;
  align-content: center;
  flex-direction: column;
  height: 500px;
  border: solid 1px red;
}
.container img {
  align-self: center;
}
.container p {
  text-align: center;
}
We are setting the display mode to flex, setting the content-alignment rule to center, and the flex direction to column. If you don’t set the direction the items will be displayed next to each other instead of stacked vertically. The flex-direction rule defaults to row. The extra style on the image is to prevent the flex layout from stretching the image to fit the container which is the default for align-self (stretch).
The result:
Complete Example
Here is the complete HTML file I used to generate the above results if you would like to experiment with the various options for Flexbox. The CSS Tricks website has a great article on everything Flex. Check it out if you want to see how else this feature can make your life easier.
<html lang="en">
<head>
  <meta charset="UTF-8">
  <meta name="viewport" content="width=device-width, initial-scale=1.0">
  <meta http-equiv="X-UA-Compatible" content="ie=edge">
  <title>Center content vertically in a div element using flex</title>
  <style>
    .container {
      display: flex;
      align-content: center;
      flex-direction: column;
      justify-content: center;
      height: 500px;
      border: solid 1px red;
    }
    .container img {
      align-self: center;
    }
    .container p {
      text-align: center;
    }
  </style>
</head>
<body>
  <div class="container">
    <img src="https://lorempixel.com/400/200/" alt="random 400x200 placeholder image from lorempixel"/>
    <p>A random 400 x 200 pixel placeholder image from lorempixel.com</p>
  </div>
</body>
</html>
~Rob
Jul 29, 2019 | asp.net, dotnet, quick tips, web development, webapi
Problem
I do a work everyday in my professional life in Microsoft’s ASP.NET application framework. In more recent year I started utilizing more and more WEBAPI call through jQuery calls instead of trying to load data during a page’s Page_Load event. WEBAPI handles a lot of the conversions of datatypes to JSON (JavaScipt Object Notation) format for you. Sometimes I have simple calls that can be called directly from typing the URL into the browser and passing values through the use of the QueryString parameters. The idea being I could quickly test a WEBAPI call by typing a URL directly into the browser and making sure it’s working correct. Usually doing this returns the value in XML format and not the JSON format that I would expect when I call it from a jQuery Ajax call. I know I could use a utility like POSTMAN, which I love, but it just seems like I should be able to type the URL while I’m running the application in Visual Studio and get the results the way I want it.
Solution
I ran across and article on how to solve this problem. Adding this code into my application startup allows my to add a type parameter to the QueryString to force the format I want.
GlobalConfiguration.Configuration.Formatters.JsonFormatter.MediaTypeMappings.Add( new QueryStringMapping("type", "json", new MediaTypeHeaderValue("application/json")));

GlobalConfiguration.Configuration.Formatters.XmlFormatter.MediaTypeMappings.Add( new QueryStringMapping("type", "xml", new MediaTypeHeaderValue("application/xml")));
This little gem of code adds a QueryString parameter to a media type header value auto-magically. If I had a fictitious WEBAPI controller that returns detail for a customer record with an id of 100 that looks something like this:
http://myawesomeapplication.com/api/customers/get/100
I could just append a ?type=json to then to force the return value to json without ever leaving the browser debug session I’m working in.
http://myawesomeapplication.com/api/customers/get/100?type=json
Pretty Cool!
~Rob
Jul 26, 2019 | javascript, sound, technical advances, visual basic, web development
History
Almost 20 years ago a wrote a small Visual Basic 3.0 program to generate sound “environments”. It was a fun project to create a utility for role playing games. I thought it would be cool to add a “sound” element to games to help the player be more immersed into the game by adding another sense to the mix. It used Microsoft’s Direct Sound library to mix sounds together and play. It allowed me to play multiple sounds and have them play at the same time even though they were starting and stopping at different times. The code was for the program itself wasn’t too complex but the technologies behind playing the sounds where pretty sophisticated. DirectX was the domain of C++ and game developers.
I had played role playing games during high school but not too much after that, life and growing up in general got in the way. I had a group of friends who played religiously every week and they still do some 35 years later. My idea was to create a program that could create ambiance sounds for different scenarios that would be played during an adventure. Background sounds for a taverns, forests, storms, haunted houses and even battles. I called it DungeonFX – Hear what You’ve Been Missing. Like most of my ideas it was going to be really BIG! Like most of my ideas I lost interest before I finished and it never made it big. This seems to be recurring theme in my life.
The project was more than just playing a single static audio file. They were totally randomly generated environments that really never repeated. I was able to create a working version that consisted of text file to define the various component sounds and how they where played that made up the “environment”. It was some sort of homegrown format I created that was like a windows.ini (if you are old enough to know what I’m talking about) file but used html like tags to break up the sections. I have no idea why I did it this way, it was a long time ago, you’ll have to give me a break.
The components that comprised an environment were backgrounds sounds, sound events, and a single music track. Pretty simple but the results actually turned out quite impressive. The environments where packaged into zip archives that just had a custom .dfx extension. The archive contained the configuration file and the various sounds files that would be played to create the sound track. Being years ago, the sound files for the backgrounds and events where .wav files and the music sounds track was a a .midi file. When an environment was request to be played the program would unzip all the components and play the various sounds defined in the environment file based on specific parameters defined for each of those sounds.
How did all this work? An example environment file is a good way to start. Here is a sample file that created a stormy night complete with rain, wind gusts and random thunder and lightning:
<environment>
version=1.0
Name=Storm
description=Storm with light rain and thunder.
author=rob
date=04/12/2001
email=me@maximumrob.com
</environment>

<background>
rain.wav,70
</background>

<music>
track.midi
</music>

<event>
thunder.wav,0,100,-1,5,50
thunder6.wav,0,100,-1,5,20
thunder7.wav,0,100,-1,6,30
thunder5.wav,0,100,-1,10,20
howlwind.wav,40,0,0,60,60
</event>
Environment Section
This section just contained the various meta data for the environment. Name, author and other relative information that would be display in the player program
Backgrounds
This section had one line for each background sound that would be placed when the environment started playing. All the background sounds where designed to be played in a infinite loop while the environment was actively playing. For each background you could specify the volume (from 1 to 100) that the sound would play at. In this example it was only playing a rain loop. It could have easily added other sounds like a crackly camp fire or crickets.
Music
Music was similar to a background sound as it played in a loop. Difference was it was a midi music file. Gave the option of playing a soundtrack to go along with the sounds.
Events
These are the items that make the environment random. These are sound that only play when specific criteria are met. The example above has 4 different thunder events and 1 howling wind event. You can add as many sounds events that you like. The numbers after each sound defines when and how the sound is played. The number are as follows:
Min Volume, Max Volume, Random Volume, Frequency, Possibility

Min Volume - This is the minimum volume the event will play out if the volume is random. It is also the static volume the event will always play at is the volume is not random.
Max Volume - This is the maximum volume the event will pay at if the volume is random. It is not used if the volume isn't random.
Random Volume - Flag is this event generates a random volume each time it fires.
Frequency - Who often (in seconds) to check if the event happens.
Possibility - Percentage change (1-100) that the event fires and play.
These options allow a lot of flexibility. You can choose how rare or regular events are. Setting a frequency to 30 seconds and a possibility to 2% would make a event hardly ever happen. Setting a frequency to 5 seconds and a possibility to 100% would cause a sounds event to fire every 5 seconds consistently. Volumes can be set to a specific volume or random. This has the effect of making an event sound closer or further away adding to the randomness.
I had also implement some experiments in 3D sound. This would allow an event to originate from a specific point in 3D space. If you were playing an environment in surround sound you could make a event sound like it was happening behind you. Another idea was to play an animated 3D sound where the sound would play moving along a path in 3D space. Imagine the sound an insect flying around your head or a car passing by. I never implemented the path feature but thought it would have brought even more COOL to an already pretty awesome little program.
So why this trip down memory lane?
I ran across the code for this utility a few months ago. I started to remember all the complicated libraries I had to use to make it happen. Then I start thinking about how far software development had progressed over this 20 years, specifically web development. I started to wonder if I could rewrite this sound generating machine using web technologies like html and JavaScript. It took me all of 10 minutes to decide I was going to give it a try, and 5 minutes after that I had been laying out the foundation for moving this to the web.
To my surprise I had a working port of this program running on a web page using JavaScript in about 3 hours. I used Howler.js , which is an excellent JavaScript audio library. It was able to replace everything that I was doing using the DirectX library. I ported my environment file to a json format and dropped the whole idea of a zip file. I upgraded the sounds to mp3 files instead of the larger .wav files since it was downloading all the resources for web. I was shocked at how fast I was able to put this all together. I think the original version took me a month to get working the way I wanted and here it was running in a web browser in one evening.
This new version doesn’t have all the features the original visual basic program has. I need to find a good midi library to implement the background music soundtrack and I didn’t implement the 3D sounds but Howler.js does have that ability. I will probably add that when I have some extra time. I never got to hear what that sounded like but I think it would be pretty amazing. I threw the result on a website called soundfx.io. It just plays a single storm environment is created for testing.
Here is an updated environment.json file using sounds I found on a great sound resource site freesound.org. Check them out and support them if you are into sounds. I added settings for the 3D sounds even though I haven’t implemented the feature yet. The overall readability of this format is so much better than the original I created.
{
"meta": {
"version": "1.0",
"description": "Two looped rain tracks with random thunder and lighting effects.",
"name": "Stormy Night",
"author": "Rob",
"email": "me@maximumrob.com"
},
"background": [
{
"file": "231686__fenrirfangs__rain-2.mp3",
"volume": 60
},
{
"file": "346642__inspectorj__rain-on-windows-interior-a.mp3",
"volume": 75
}
],
"event": [
{
"file": "253953__yoyodaman234__thunder-1.mp3",
"minVolume": 0,
"maxVolume": 100,
"randomVolume": true,
"frequency": 5,
"percentage": 40,
"is3D": false,
"posX3D": false,
"posY3D": false,
"posZ3d": false
},
{
"file": "324048__karas-homemade-sfx__wind-soundeffect.mp3",
"minVolume": 0,
"maxVolume": 100,
"randomVolume": true,
"frequency": 3,
"percentage": 45,
"is3D": false,
"posX3D": false,
"posY3D": false,
"posZ3d": false
},
{
"file": "394921__parasonya__022-single-strike.mp3",
"minVolume": 0,
"maxVolume": 100,
"randomVolume": true,
"frequency": 7,
"percentage": 60,
"is3D": false,
"posX3D": false,
"posY3D": false,
"posZ3d": false
},
{
"file": "399656__bajko__sfx-thunder-blast.mp3",
"minVolume": 30,
"maxVolume": 70,
"randomVolume": true,
"frequency": 5,
"percentage": 55,
"is3D": false,
"posX3D": false,
"posY3D": false,
"posZ3d": false
},
{
"file": "400987__techienanna__rumblings-of-thunder.mp3",
"minVolume": 10,
"maxVolume": 90,
"randomVolume": true,
"frequency": 5,
"percentage": 35,
"is3D": false,
"posX3D": false,
"posY3D": false,
"posZ3d": false
},
{
"file": "101948__juskiddink__dry-thunder3.mp3",
"minVolume": 10,
"maxVolume": 75,
"randomVolume": true,
"frequency": 3,
"percentage": 25,
"is3D": false,
"posX3D": false,
"posY3D": false,
"posZ3d": false
},
{
"file": "121945__hantorio__thunder-close.mp3",
"minVolume": 45,
"maxVolume": 80,
"randomVolume": true,
"frequency": 3,
"percentage": 65,
"is3D": false,
"posX3D": false,
"posY3D": false,
"posZ3d": false
}
]
SOUNDFX.IO
http://soundfx.io
*please note some browsers (I’m looking at you Chrome) require you to perform an event, like a clicking on the page, before it will start playing sounds.
Man…. I think this is going to be HUGE! 😜
~Rob